理解Linux memory overcommit和OOM Killer机制
最近在OpenCloudOS安装Redis dnf install redis,发现 /var/log/redis.log 日志里面有段提示,说需要设置 vm.overcommit_memory 内核参数:
328533:M 23 Mar 2024 10:45:01.160 # WARNING overcommit_memory is set to 0! Background save may fail under low memory condition. To fix this issue add 'vm.overcommit_memory = 1' to /etc/sysctl.conf and then reboot or run the command 'sysctl vm.overcommit_memory=1' for this to take effect.
之前也遇到过OOM(Out of Memory) Killer错误,Linux系统把一些内存使用量大的程序直接干掉,比如Redis、MySQL服务。
查看最近发生的OOM
less /var/log/messages | grep oomDec 21 20:31:08 opencloudos kernel: [34766743.624644] redis-server invoked oom-killer: gfp_mask=0x201da, order=0, oom_score_adj=0
查看被系统killed的进程
egrep -i -r 'Killed process' /var/log/var/log/messages-20240512:May 9 13:50:40 VM-4-3-opencloudos kernel: Out of memory: Killed process 1819454 (mysqld) total-vm:1831920kB, anon-rss:508720kB, file-rss:0kB, shmem-rss:0kB, UID:27 pgtables:1484kB oom_score_adj:0
OOM Killer发生机制
Linux 内核根据应用程序的要求分配内存,通常来说应用程序分配了内存但是并没有实际全部使用,为了提高性能,这部分没用的内存可以留作它用,这部分内存是属于每个进程的,内核直接回收利用的话比较麻烦,所以内核采用一种过度分配内存(over-commit memory)的办法来间接利用这部分 “空闲” 的内存,提高整体内存的使用效率。一般来说这样做没有问题,但当大多数应用程序都消耗完自己的内存的时候麻烦就来了,因为这些应用程序的内存需求加起来超出了物理内存(包括 swap)的容量,内核(OOM killer)必须杀掉一些进程才能腾出空间保障系统正常运行。用银行的例子来讲可能更容易懂一些,部分人取钱的时候银行不怕,银行有足够的存款应付,当全国人民(或者绝大多数)都取钱而且每个人都想把自己钱取完的时候银行的麻烦就来了,银行实际上是没有这么多钱给大家取的。
内核检测到系统内存不足、挑选并杀掉某个进程的过程可以参考内核源代码 linux/mm/oom_kill.c:
/**
 * oom_badness - heuristic function to determine which candidate task to kill
 * @p: task struct of which task we should calculate
 * @totalpages: total present RAM allowed for page allocation
 *
 * The heuristic for determining which task to kill is made to be as simple and
 * predictable as possible.  The goal is to return the highest value for the
 * task consuming the most memory to avoid subsequent oom failures.
 */
unsigned long oom_badness(struct task_struct *p, struct mem_cgroup *memcg,
              const nodemask_t *nodemask, unsigned long totalpages)
{
    long points;
    long adj;

    if (oom_unkillable_task(p, memcg, nodemask))
        return 0;

    p = find_lock_task_mm(p);
    if (!p)
        return 0;

    adj = (long)p->signal->oom_score_adj;
    if (adj == OOM_SCORE_ADJ_MIN) {
        task_unlock(p);
        return 0;
    }

    /*
     * The baseline for the badness score is the proportion of RAM that each
     * task's rss, pagetable and swap space use.
     */
    points = get_mm_rss(p->mm) + p->mm->nr_ptes +
         get_mm_counter(p->mm, MM_SWAPENTS);
    task_unlock(p);

    /*
     * Root processes get 3% bonus, just like the __vm_enough_memory()
     * implementation used by LSMs.
     */
    if (has_capability_noaudit(p, CAP_SYS_ADMIN))
        adj -= 30;

    /* Normalize to oom_score_adj units */
    adj *= totalpages / 1000;
    points += adj;

    /*
     * Never return 0 for an eligible task regardless of the root bonus and
     * oom_score_adj (oom_score_adj can't be OOM_SCORE_ADJ_MIN here).
     */
    return points > 0 ? points : 1;
}
当系统内存不足的时候,out_of_memory() 被触发,然后调用 select_bad_process() 选择一个 “bad” 进程杀掉,如何判断和选择一个 “bad” 进程呢,总不能随机选吧?挑选的过程由选择进程的函数 oom_badness()决定,挑选的算法和想法都很简单很朴实:最 bad 的那个进程就是那个最占用内存的进程。
主要参考打分参数:oom_adj、oom_score_adj 和 oom_score:用来控制进程打分(分数越高,就先杀谁)
内核会对进程打分(oom_score),主要包括两部分,系统打分和用户打分。系统打分就是根据进程的物理内存消耗量;用户打分就是 oom_score_adj 的值。如果用户指定 oom_score_adj 的值为 -1000,也就是表示禁止 OOM killer 杀死该进程。
还有一个旧的接口参数 oom_adj,其功能类似oom_score_adj,为了兼容,目前仍然保留这个参数,当操作这个参数的时候,kernel实际上是会换算成oom_score_adj。
这三个参数的关联性比较紧密,都和具体的进程相关,位置都是在 /proc/进程PID/ 目录下。
oom_badness()函数
该函数会计算每个进程的点数(0~1000)。点数越高,这个进程越有可能被杀死。每个进程的点数跟oom_score_adj有关,而且 oom_score_adj可以被设置(-1000最低,1000最高)。
调整 oom_score_adj
从上面的 oom_kill.c 代码里可以看到 oom_badness() 给每个进程打分,根据 points 的高低来决定杀哪个进程,这个 points 可以根据 adj 调节,root 权限的进程通常被认为很重要,不应该被轻易杀掉,所以打分的时候可以得到 3% 的优惠(adj -= 30; 分数越低越不容易被杀掉)。我们可以在用户空间通过操作每个进程的 oom_adj 内核参数来决定哪些进程不这么容易被 OOM killer 选中杀掉。
比如,如果不想 MySQL 进程被轻易杀掉的话可以找到 MySQL 运行的进程号后,调整 oom_score_adj 为 -15(注意 points 越小越不容易被杀):
# ps aux | grep mysqld
mysql    2196  1.6  2.1 623800 44876 ?        Ssl  09:42   0:00 /usr/sbin/mysqld

# cat /proc/2196/oom_score_adj
0
# echo -15 > /proc/2196/oom_score_adj
对于Redis来说,可以直接在 /etc/redis.conf 里面进行oom-score-adj / oom-score-adj-values 参数配置:
############################ KERNEL OOM CONTROL ##############################

# On Linux, it is possible to hint the kernel OOM killer on what processes
# should be killed first when out of memory.
#
# Enabling this feature makes Redis actively control the oom_score_adj value
# for all its processes, depending on their role. The default scores will
# attempt to have background child processes killed before all others, and
# replicas killed before masters.
#
# Redis supports these options:
#
# no:       Don't make changes to oom-score-adj (default).
# yes:      Alias to "relative" see below.
# absolute: Values in oom-score-adj-values are written as is to the kernel.
# relative: Values are used relative to the initial value of oom_score_adj when
#           the server starts and are then clamped to a range of -1000 to 1000.
#           Because typically the initial value is 0, they will often match the
#           absolute values.
oom-score-adj no

# When oom-score-adj is used, this directive controls the specific values used
# for master, replica and background child processes. Values range -2000 to
# 2000 (higher means more likely to be killed).
#
# Unprivileged processes (not root, and without CAP_SYS_RESOURCE capabilities)
# can freely increase their value, but not decrease it below its initial
# settings. This means that setting oom-score-adj to "relative" and setting the
# oom-score-adj-values to positive values will always succeed.
oom-score-adj-values 0 200 800
配置 OOM killer
我们可以通过一些内核参数来调整 OOM killer 的行为,避免系统在那里不停的杀进程。比如我们可以在触发 OOM 后立刻触发 kernel panic,kernel panic 10秒后自动重启系统。
# sysctl -w vm.panic_on_oom=1
vm.panic_on_oom = 1

# sysctl -w kernel.panic=10
kernel.panic = 10

# echo "vm.panic_on_oom=1" >> /etc/sysctl.conf
# echo "kernel.panic=10" >> /etc/sysctl.conf
OOM相关配置参数
vm.panic_on_oom 参数
用来控制当内存不足时该如何做。
查看当前系统使用的是哪种oom策略
cat /proc/sys/vm/panic_on_oom- 值为0(默认值),表示当发生oom时,内核会调用oom_killer查杀一部分进程。通常情况下,oom_killer通过杀掉失控进程以确保系统稳定运行。
- 值为1:内存不足时,有可能会触发 kernel panic(系统重启),也有可能启动 OOM killer。如果某个进程通过 mempolicy/cpusets 限制使用节点,并且这些节点成为内存耗尽状态,则可能会被 oom-killer 杀死一个进程。在这种情况下不会发生panic。因为其他节点的内存可能是空闲的。
- 值为2:内存不足时,表示强制触发 kernel panic,内核崩溃GG(系统重启)。
vm.oom_kill_allocating_task参数
用来决定触发OOM时先杀掉哪种进程
cat /proc/sys/vm/oom_kill_allocating_task- 值为0:会 kill 掉得分最高的进程。
- 值为非0:会kill 掉当前申请内存而触发OOM的进程。
当然,一些系统进程(如init)或者被用户设置了oom_score_adj的进程等可不是说杀就杀的。
vm.oom_dump_tasks参数
用来记录触发OOM时记录哪些日志
cat /proc/sys/vm/oom_dump_tasksoom_dump_tasks参数可以记录进程标识信息、该进程使用的虚拟内存总量、物理内存、进程的页表信息等。
- 值为0:关闭打印上述日志。在大型系统中,可能存在上千进程,逐一打印使用内存信息可能会造成性能问题。
- 值为非0:有三种情况会打印进程内存使用情况。
1、由 OOM 导致 kernel panic 时;
2、没有找到符合条件的进程 kill 时;
3、找到符合条件的进程并 kill 时。
完全关闭OOM Killer
当然,如果需要的话可以完全关闭 OOM killer(不推荐用在生产环境)
# sysctl -w vm.overcommit_memory=2

# echo "vm.overcommit_memory=2" >> /etc/sysctl.conf
理解Linux memory overcommit
理解 vm.overcommit_memory 的关键:commit(或overcommit)针对的是内存申请,内存申请不等于内存分配,内存只在实际用到的时候才分配。
参数vm.overcommit_memory含义:
overcommit的中文意思是过量使用,那overcommit_memory指的就是过量使用内存。这个参数决定了操作系统在应对应用申请内存时是如果分配的。(为什么会过量使用,不应该是有多少使用多少吗?因为在系统中并不是申请了多少内存就立即分配多少,有可能申请了10G,使用时仅分配了5G,这样就有5G内存在应用运行期间暂时闲置。如果有大量应用申请内存,那么就会有很多暂时闲置的内存。)
内存申请不等于内存分配,内存只在实际用到的时候才分配。
参数vm.overcommit_memory三种取值
overcommit_memory 指定了内核针对内存分配的策略,其值可以是0、1、2:
#define OVERCOMMIT_GUESS        0
#define OVERCOMMIT_ALWAYS       1
#define OVERCOMMIT_NEVER 2- 0 – Heuristic overcommit handling. 缺省值,它允许overcommit,但过于明目张胆的overcommit会被拒绝,比如malloc一次性申请的内存大小就超过了系统总内存。Heuristic的意思是“试探式的”,内核利用某种算法猜测你的内存申请是否合理,它认为不合理就会拒绝overcommit。Heuristic overcommit算法基本上可以这么理解:单次申请的内存大小不能超过 【free memory + free swap + pagecache的大小 + SLAB中可回收的部分】,否则本次申请就会失败。
- 1 – Always overcommit. 允许overcommit,表示内核允许分配所有的物理内存,对内存申请来者不拒,而不管当前的内存状态如何。
-
2 – Don’t overcommit. 禁止overcommit。申请的内存无法满足时,则禁止分配。那阈值是多少,由内部算法决定。它是通过内核参数vm.overcommit_ratio或vm.overcommit_kbytes间接设置的。参考代码:
unsigned long vm_commit_limit(void)
{
unsigned long allowed;

if (sysctl_overcommit_kbytes)
    allowed = sysctl_overcommit_kbytes >> (PAGE_SHIFT - 10);--将计数单位由KB转成page
else
    allowed = ((totalram_pages - hugetlb_total_pages())
           * sysctl_overcommit_ratio / 100);
allowed += total_swap_pages;

return allowed;
}
当没有设置 vm.overcommit_kbytes 时,通过 vm.overcommit_ratio 参数来计算允许的阈值,大致公式如下:
CommitLimit = (Allowed Physical RAM * vm.overcommit_ratio / 100) + Swapovercommit_ratio默认为50,表示物理内存的50%,如有特殊需求,可以自己修改。
查看当前系统的默认阈值:
cat /proc/meminfo | grep Commit
其中,CommitLimit指的就是overcommit的阈值,只要超过这个值,在参数设为2的情况下,系统就不允许申请内存。
/proc/meminfo中的 Committed_AS 表示目前操作系统所有进程已经申请的内存总大小。(申请不代表已分配)
另一种查看阈值方式
sar -r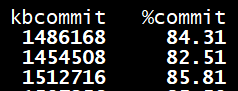
sar -r 查看内存使用状况的常用工具,它的输出结果中有两个与overcommit有关,kbcommit 和 %commit:
kbcommit对应/proc/meminfo中的 Committed_AS;
%commit的计算公式并没有采用 CommitLimit作分母,而是Committed_AS/(MemTotal+SwapTotal),意思是_内存申请_占_物理内存与交换区之和_的百分比。
如何修改Linux vm.overcommit_memory方法
1、编辑/etc/sysctl.conf ,改vm.overcommit_memory=1,然后sysctl -p 使配置文件生效
2、sysctl -w vm.overcommit_memory=1
3、echo 1 > /proc/sys/vm/overcommit_memory
总结
设置为2,禁用overcommit,会降低内存的使用效率,浪费内存资源。但是不会发生OOM。
设置为1,不建议使用。
设置为0,默认值,适度超发内存,但也有OOM风险。(这也是数据库经常发生OOM的原因)
参考链接